
What is Linkerd?
Similar to Istio, this is a service mesh. It provides more or less the same functionality that Istio does, and the architecture is also very similar. Therefore, if you choose to switch from Istio to Linkerd, then the learning curve should be rather minimal. The two service meshes also maintain the same service mesh architecture and the differences are rather minimal. So let’s start by talking about what is different. I
Envoy vs Linkerd-proxy
The most notable difference between Istio and Linkerd is that while Istio uses Envoy as the proxy that gets attached to microservices, Linkerd uses its own purpose-built proxy. The makes the whole solution more light-weight, and therefore, faster. While Envoy is a proxy with many use cases, Linkerd-proxy only has a single purpose: being the most lightweight, secure, and simplest proxy available for the specific scenario of being a Kubernetes sidecar proxy. If you’re interested, you can read the blog post on the Linkerd website that specifies the multitude of reasons for a separate proxy to exist.
The lightweight nature allows Linkerd to operate very non-intrusively and allows you to add and remove features of Linkerd from your cluster on the fly.
When it comes to the other features of Linkerd, they are pretty close to what you get from Istio. The same level of metrics, logging, etc… is available, and you might even find the configuration a bit simpler. So let’s take a look at that.
Setting up Linkerd
As with Istio, you have a few requirements before you can set up Linkerd. A Kubernetes cluster is an obvious one, and Minikube is also a valid option if you want to get a cluster up and running. Similar to istio, you need to set up the linkerd CLI. Do that with:
curl --proto '=https' --tlsv1.2 -sSfL https://run.linkerd.io/install | sh
Linkerd also provides a handy way to verify that your cluster is Linkerd-ready. If you come across any problems, Linkerd also provides various solutions you may try. There are a certain number of requirements to running linkerd, and you need to have a cluster that can handle them, so run this:
linkerd check --pre
Finally, install linkerd to your cluster:
linkerd install | kubectl apply -f -
You might notice that the installation gets applied to your cluster in the same way a normal Kubernetes resource gets applied. Setting up the control plane may take a while, so make sure you run linkerd check to see if everything has been installed properly. However, this is not the only way to install Linkerd to your cluster, and you could install Linkerd as a Helm chart.
As we did with Istio, let’s get our hands dirty by going through a demo application that uses Linkerd. We will use a demo that is provided by Linkerd, which you can install with:
curl --proto '=https' --tlsv1.2 -sSfL https://run.linkerd.io/emojivoto.yml | kubectl apply -f -
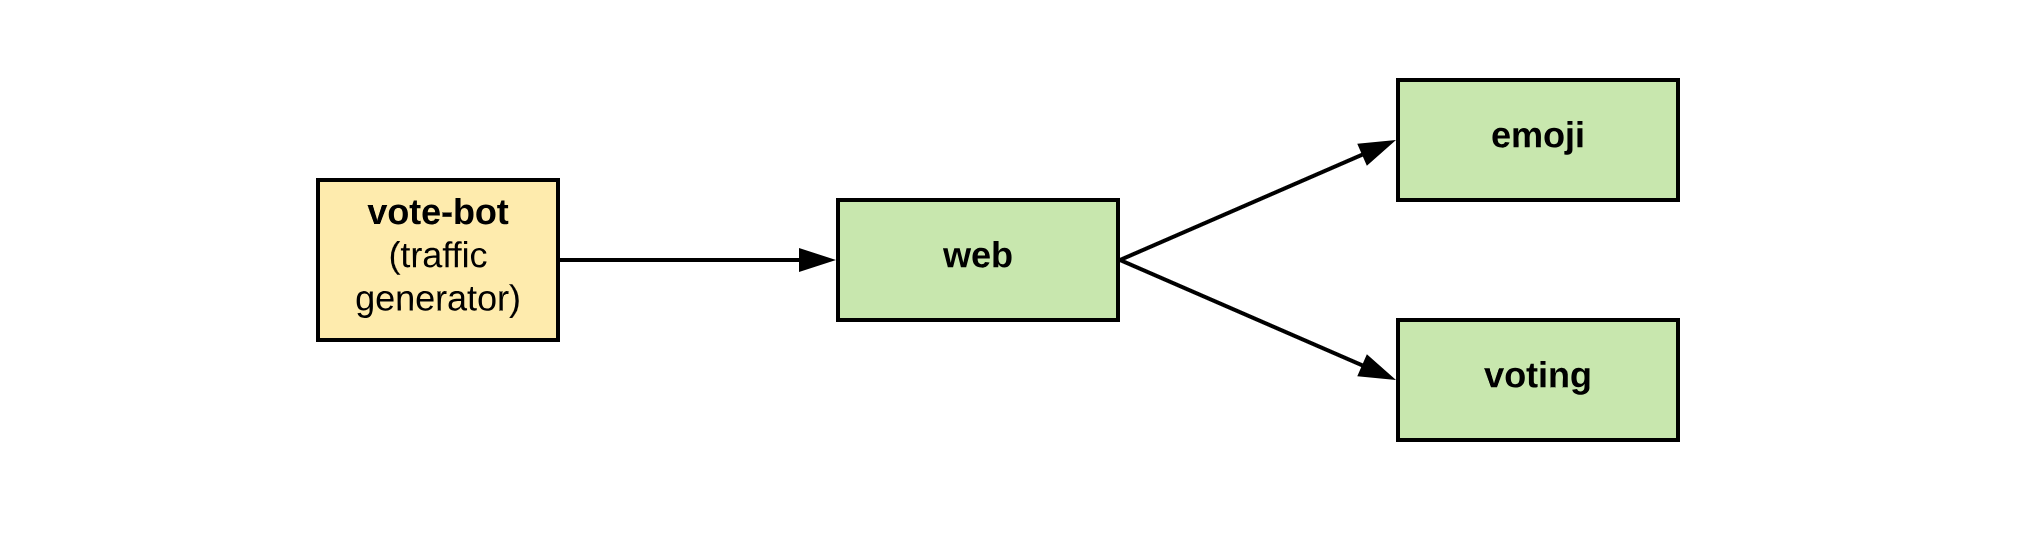
This installs several services, deployments, and other resources such as service accounts which set up a functioning infrastructure usable by Linkerd. The application here is a simple web app that allows users to vote for various emojis. You can find the architecture of the application below:
You should go ahead and fire it up, which you can do with port forwarding the service to localhost:8080:
kubectl -n emojivoto port-forward svc/web-svc 8080:80
Note that the site is not fully functional. Let’s now go ahead and mesh the application with Linkerd.
Linkerd configuration
There are two ways you can inject Linkerd into your cluster. One is by adding an annotation into your yaml:
annotations:
    linkerd.io/inject: enabled
The second is by injecting it on the fly:
kubectl get -n emojivoto deploy -o yaml | linkerd inject - | kubectl apply -f -
Note that “on the fly” means literally on the fly. Linkerd can deploy to your cluster as a rolling deployment, meaning that your application will get no downtime. Note that you previously had all the necessary resources deployed to the emojivoto namespace that are taken in the step and piped to the linkerd inject command that rolls over to the apply command which updates each pod to work with Linkerd. Now if you were to visit the application on your browser, you should be able to see a meshed version of the application running there. Of course, you won’t see any changes to the actual site, but let’s get to that next.
For now, check on the proxy to see if it handles requests properly:
linkerd -n emojivoto check --proxy
One thing to note is that this process might look a lot more lightweight than the process we used to install Istio. This makes sense since the whole point of Linkerd was to make it as lightweight as possible.
Checking the application
Now that you have a fully meshed application, let’s dig deeper into it and see what the meshing provides us. In the same way, we used kiali with Istio to visualize the Istio mesh, we will use Viz, which will provide an equally competent dashboard and metrics system. Install it with:
linkerd viz install | kubectl apply -f -
Don’t forget to check whether the installation was successful (linkerd check). Once you verify that, pop open the dashboard:
linkerd viz dashboard &
And that’s it! A painless, easy-to-maintain setup. If you want to learn more about Linkerd, then head over to the official documentaion which, in my opinion, is very well written.