
DevSpace
Even with the enhancements, we have to CI/CD, testing a Kubernetes application can be troublesome. While tools like Minikube can help you set up a cluster locally within minutes and get right to testing, it’s still a long way between there and the final round of testing on an actual k8 server. You would have to verify that it works locally, create a pull request, get it reviewed, and merge it before your change gets integrated with the existing Kubernetes dev cluster. If you have tools such as ArgoCD, it can automate the last step for you but even then, it still takes a fair amount of time.
This doesn’t really work well with a shift-left idealogy, where the idea is to do thorough testing at each stage so that errors are caught early. To facilitate this, we can use DevSpace.
What DevSpace does
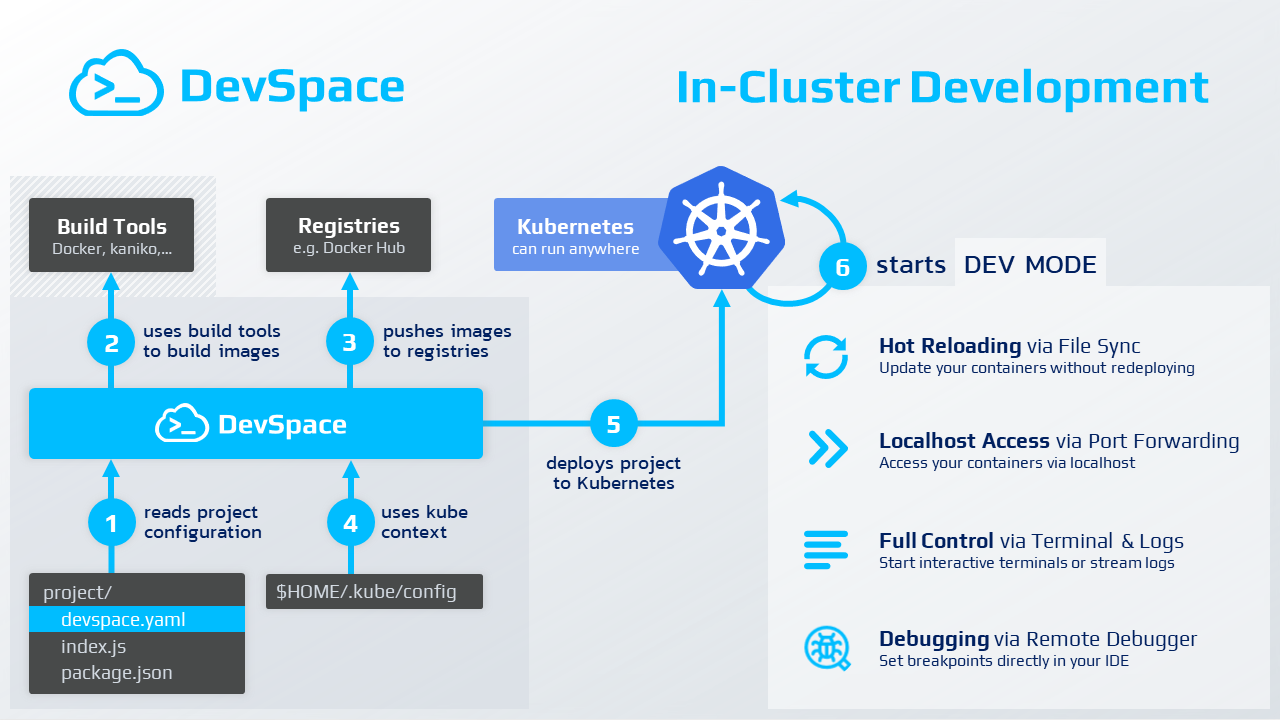
Instead of going through all the steps, it takes to get your change to a Kubernetes cluster, DevSpace allows you to deploy your code to the cluster with every change. It does this by maintaining a configuration file that uses your dockerfile to continuously create and reload the container from your code. Now, it’s important to note that DevSpace does not create a new image per change and redeploy the whole container since that would be impractical. Instead, it hot reloads the running container to synchronize your files as you code. This means that you can have log streams running from the container, attach debuggers, etc… without having to worry about the container going offline for each change you do.
DevSpace is also compatible with all sorts of clusters. You could use it on locl clusters managed by Minikube or Microk8s, managed clusters such as AKS and LKE, or self-managed clusters such as Rancher. This level of compatibility makes it possible for any developer to use DevSpace regardless of the size of the application they are running.
Since everyone who uses Kubernetes would have to be familiar with kubectl, DevSpace has the command line syntax made to match that of kubectl. The commands are rather simple. For example, devspace init initializes your repo and prepares it for deployment while devspace deploy deploys your project using either kubectl or helm. To watch your files for any changes, you use devspace dev.
DevSpace also comes with a handy UI, which you can bring up using devspace ui. From here, you would be able to start terminal sessions, see real-time logs, inspect namespaces and perform monitoring of your DevSpace.
Since we will only be using DevSpace for development work, it will only ever run in a client machine which is why DevSpace is portrayed as a client-only tool. A high-level design of the system can be found below.
The devspace.yaml allows you to write a declarative script that handles the workflow surrounding the handling of your application. This config file is best written by the person on your team who has the most knowledge of the cluster and its requirements. Preferably an expert in Kubernetes and DevOps. Once this file has been created and the workflow defined, everyone else just has to pull the config file to their local machines and start working with it.
Now, let’s try DevSpace and see what it has to offer with some practice.